Aadhar Card (आधार कार्ड) – Get Aadhaar Card Complete Information Online
- Other Laws|Blog|
- 21 Min Read
- By Taxmann
- |
- Last Updated on 25 November, 2023
Table of Contents
- All-about the Aadhaar Number
- Benefits of Aadhar Card
- Documents Required for Aadhaar Card
- How to apply for Aadhaar Card
- How to Check Aadhaar Application Status Online
- What is the Aadhar Enrolment Number?
- Linking of PAN with Aadhaar
- Unable to Link PAN with Aadhaar? Here’s What to Do
- How to lock Aadhaar biometrics online?
- Baal-Aadhaar
- What is Aadhaar eSign?
- What is a Masked Aadhaar Card?
- What Happens if PAN Becomes Inoperative?
- How to submit a Grievance if Aadhaar cannot be linked with PAN?
- Aadhaar Services
- Frequently Asked Questions (FAQs)
1. All-about the Aadhaar Number
Aadhaar is a unique, 12-digit identification number given to residents of India. It is required to be mentioned on each resident’s income-tax return and application for a Permanent Account Number (PAN). Furthermore, from 1st September 2019, Aadhaar can be used interchangeably with PAN. PAN and Aadhaar had to be linked by residents before 30th June 2023.
1.1 Understanding Aadhaar
The Aadhaar Number, assigned to each resident, is a unique 12-digit code linked to an individual’s biometric data.
1.2 Who is Eligible for Aadhaar?
Aadhaar is available to every resident of India who can provide their demographic and biometric information during the enrollment process. Notably, Non-Resident Indians (NRIs), both minors and adults, with a valid Indian passport, can also apply for Aadhaar upon their arrival in India without waiting for 182 days.
1.3 The Concept of Enrolment ID
Before receiving an Aadhaar Number, an individual must register with the enrollment agency. This enrollment process involves collecting an individual’s demographic and biometric data, after which an ‘Enrolment ID’ – a unique 28-digit number – is generated.
1.4 Aadhaar’s Role in Tax Returns and PAN Applications
Aadhaar has become an essential element in tax administration. It is now mandatory for those eligible to obtain Aadhaar to include this number in their Income Tax Return (ITR) form and PAN application. If the individual doesn’t possess an Aadhaar number, the Enrolment ID can be quoted instead.
1.5 PAN-Aadhaar Linking – A Necessity
Since 1st July 2017, PAN holders eligible for an Aadhaar number must link their PAN with Aadhaar. The deadline for this linking was extended multiple times, with the most recent deadline being 31st March 2022. If an individual fails to link their PAN with Aadhaar by this date, the PAN will become inoperative. However, the PAN can be reactivated by linking it with Aadhaar after this date, subject to a fee.
2. Benefits of Aadhar Card
| Pan Card & Income tax | In September 2018, the Supreme Court validated the integration of Aadhaar with PAN. This interconnection between Aadhaar and PAN is a mandatory prerequisite for individuals to file their tax returns using their PAN card successfully. |
| Trading Account Opening | Creating a trading account involves a significant procedure known as the Know Your Customer (KYC) process. Utilizing an Aadhaar card, this process can be effortlessly accomplished and verified through online mean |
| Identity Card | Aadhaar is a biometric-based authentication system serving as a prevalent form of photographic identification in India. Consequently, it can be utilized as an official or travel identity verification document. |
| Driving license | As stated by the Ministry of Road Transport and Highways, Aadhaar can serve as proof of address and age. Moreover, an option exists to associate your Aadhaar card number with your driving license, thereby preventing the existence of duplicate license holders. |
| Proof of Residence | Aadhaar is acknowledged as an authentic government-issued document that can be utilized as proof of residency to access a diverse range of government and private services. |
| Bank Accounts | The indispensability of Aadhaar and PAN Cards has emerged for initiating a bank account. Nevertheless, as per a verdict from the Supreme Court, the compulsion to link your Aadhaar with your bank account has been abolished. However, associating your Aadhaar card with your bank account gives you the advantage of accessing your linked accounts throughout the country. |
| Mutual Funds | SEBI has mandated that Know Your Customer (KYC) procedures must be conducted to establish any account. Including the Aadhaar card number enables the utilization of e-KYC for a streamlined application process.
Dive Deeper: |
| Provident funds | The presence of numerous EPF member IDs poses difficulties during the consolidation process. Yet, making provident fund withdrawals or transfers more straightforward is achievable by adopting a Universal Account Number (UAN). To activate the UAN, one can use their Aadhaar card if it hasn’t been activated already. While connecting Aadhaar to PF withdrawals is not mandatory, linking the UAN with Aadhaar as a recommended measure is advisable. |
| Jan Dhan Yojana | The Pradhan Mantri Jan Dhan Yojana (PMJDY) requires Aadhaar as the primary identification document for opening a bank account. However, individuals also have the choice to submit supplementary documents along with their Aadhaar to open a PMJDY account. |
3. Documents Required for Aadhaar Card
During the Aadhaar card enrolment process, specific documents are necessary to carry. These documents typically include proof of identity, proof of address, proof of age, and proof of relationship. Below is a comprehensive list of documents that can be provided for each category during the enrolment process:
3.1 Proof of Identity
You can present the following documents as proof of identity during the enrolment process:
-
- PAN card
- Voter ID Card
- Ration card
- Photo ID cards issued by the Government
- Passport
- NREGA job card
- Kisan photo passbook
- Pensioners’ photo ID card
- ECHS/CGHS photo card
- Address card containing name and picture issued by the Department of Posts
3.2 Proof of Address
You may use the following documents as proof of address during the enrolment process:
-
- Bank statement
- Ration card
- Passport
- A signed letter from the bank on a letterhead containing a photo
- Government photo ID cards or PSU-issued service photo identity card
- Address card with a photo issued by the Department of Posts
- A signed letter with a photo issued by a recognized educational institution on a letterhead
- Property tax receipt (not older than a year)
- Gas connection bill (not older than three months)
- Passbook
- Vehicle registration certificate
3.3 Proof of Age
The subsequent documents can be utilized as proof of age during the enrolment process:
-
- Passport
- PAN card
- Mark sheet issued by a government university or board
- SSC certificate
- State/central pension payment order
- Birth certificate
- Certificate of date of birth issued by a Group A gazetted officer on a letterhead
3.4 Proof of Relationship
The subsequent documents can be utilized as proof of relationship with the head of the family during the enrolment process:
-
- DS card
- Family entitlement document issued by the central/state government
- MNREGA job card
- Birth certificate issued by the Registrar of Birth, municipal corporation, or local Government
- Passport
4. How to Apply for Aadhaar Card
To apply for an Aadhaar Card in India, follow these steps:
Step 1: Visit the UIDAI portal and access the “My Aadhaar” section.
Step 2: Click on “Book Appointment” and proceed to your nearest Aadhaar enrolment centre.
Step 3: Prepare all necessary documents for the enrolment process mentioned above.
Step 4: Fill out the Aadhaar application form accurately with the required details.
Step 5: Submit the completed form and supporting documents to the enrolment centre.
Step 6: Attend the centre in person to provide your biometric data (fingerprint and iris scan).
Step 7: Once the formalities are concluded, you will receive an acknowledgement slip containing your Aadhaar enrolment number, which will be needed for tracking the application status.
Step 8: After verification, your Aadhaar Card will be sent to your registered address through the post. The delivery of the card typically takes around 90 days.
Dive Deeper:
How to Apply for Aadhar Card Online
5. How to Check Aadhaar Application Status Online
To verify the status of your Aadhaar Card application online, you need to use the ‘Enrolment ID’ provided in the Aadhaar Acknowledgement Slip. This ID consists of a 14-digit enrolment number (e.g., 1234/12345/12345) and a 14-digit date and time of enrolment (e.g., yyyy/mm/dd hh:mm:ss).
To verify the status of your Aadhaar enrolment online, follow these straightforward steps:
-
- Go to the UIDAI website and select “Check Aadhaar Status” under the “Get Aadhaar” section.
- Enter your enrolment number and the security code provided.
- If your Aadhaar has been generated, you will receive the Aadhaar details along with the delivery status.
Dive Deeper:
Saving Schemes: Types, Interest Rates & Comparisons
6. What is the Aadhar Enrolment Number?
You will receive an acknowledgement slip once you visit an Aadhaar Enrolment centre and successfully undergo the verification and biometric process. At the top of this slip, you will find a 14-digit enrolment number, which is essential for checking the status of your Aadhaar generation.
7. Linking of PAN with Aadhaar
Every person allotted PAN eligible to obtain an Aadhaar number shall link his PAN with Aadhaar. In case the assessee fails to do so, the PAN assigned to the person shall be made inoperative.
If the Aadhaar number isn’t yet linked with PAN, then every time the assessee logins at the e-filing portal, he will be shown a pop-up message to link his Aadhaar Number with PAN. Use the link in the pop-up window to link the Aadhaar with PAN. However, if PAN is not registered at the e-filing portal, the assessee can link the PAN-Aadhaar in the following steps:
7.1 Steps to Link PAN with Aadhaar
Step 1: Visit www.incometaxindiaefiling.gov.in, and under the menu Quick Link, select the option ‘Link Aadhaar’.

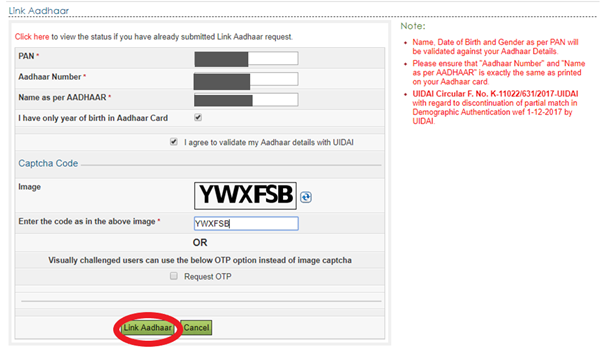
Step 2: On the landing page, fill in the details such as PAN, Aadhaar Number, Name as per Aadhaar etc., enter the Captcha and click the ‘Link Aadhaar’ button.
Step 3: The submission pop-up will appear as shown below.

Step 4: To check the status of the PAN-Aadhaar linking request, visit www.incometaxindiaefiling.gov.in and select the option ‘Link Aadhaar’ under the quick link menu. Then click on ‘Click here to view the status if you have already submitted Link Aadhaar request‘.

Step 5: In the ‘Link Aadhaar Status’ dialogue box, enter the PAN and Aadhaar Number and click ‘View Link Aadhaar Status‘.

Step 6: As shown below, the success message will appear when PAN-Aadhaar is linked.
| The Government has prescribed the following modes to link the Aadhaar number with PAN | Alternatively, Aadhaar Number can be linked with PAN in the following steps
|
| SMS | Login to e-filing portal www.incometaxindiaefiling.gov.in; |
| Send an SMS to 567678 or 56161 from your registered mobile number in the following format: | Go to ‘Profile Settings’ and click ‘Link Aadhaar’; |
| UIDPAN<12 Digit Aadhaar Number><SPACE><10 Digit PAN> | Enter ‘Aadhaar number’, ‘Name as per Aadhaar’ and click on ‘Link Aadhaar’. In case Aadhaar Card is carrying just year of birth, select the checkbox ‘I have only year of birth in Aadhaar Card’; |
| For E.g., UIDPAN 123456789000 EPOPE1234E | Give consent to validate Aadhaar details with UIDAI to complete the process of linking; |
| Online | If the details as per PAN and Aadhaar Card are the same, the linking shall be completed. |
| By visiting the website of the PAN Service providers (www.tin-nsdl.com or www.utiitsl.com) or the e-filing website (www.incometaxindiaefiling.gov.in). | |
| Paper Mode | |
| File a one-page Form and a minimal fee with the designated PAN centre. Copies of PAN card and Aadhaar card are to be furnished. | |
Dive Deeper:
Haven’t Linked your PAN with Aadhaar? Know the Consequences
How to Link Mobile Number with Aadhar
How to Update Aadhar Card
8. Unable to Link PAN with Aadhaar? Here’s What to Do
The Government of India has mandated linking PAN card with Aadhaar card before the deadline (30th June 2023). Failure to do so before 1st July 2023 will result in the inability to use your PAN card for activities like filing Income Tax Returns. However, there is an option to link your PAN and Aadhaar even after the deadline by visiting the Income Tax website and paying the prescribed fee of Rs. 1,000.
Additionally, it is essential to ensure that your name appears the same on both the PAN card and the Aadhaar card. Any spelling mismatch may prevent the successful linking of an Aadhaar with a PAN Card. If such a mismatch exists, you will need to correct your name, and after the correction, you can easily link your PAN with Aadhaar.
8.1 If you find an incorrect spelling of your name on the PAN card, take the following steps to rectify it:
Step 1: Access the NSDL (now Protean) e-filing website at https://goo.gl/zvt8eV.
Step 2: Choose ‘Changes or Correction in existing PAN data/Reprint of PAN Card (No changes in Existing PAN Data)’ from the drop-down menu.
Step 3: Select the individual category and provide your details.
Step 4: After completing Aadhaar e-KYC, make the necessary payment and submit your form online.
Step 5: Your updated PAN card will be dispatched to your registered address.
Step 6: Once you receive the corrected PAN card, you can link it with your Aadhaar.
8.2 If you happen to notice an incorrect spelling of your name on the Aadhaar card, follow these steps to rectify it:
Step 1: Head to an Aadhaar Enrolment Centre.
Step 2: Bring a self-attested copy of your proof of identity.
Step 3: Complete the Aadhaar Correction Form.
Step 4: Hand in the form along with the necessary documents.
Step 5: Receive an acknowledgement slip containing the update request number (URN).
Step 6: Utilize the URN to check the status of your update request.
Step 7: Once the name correction is processed, you can link your PAN with Aadhaar.
9. How to Lock Aadhaar Biometrics Online?
You can use two methods to lock and unlock your Aadhaar biometrics: the official UIDAI website or the mAadhaar application.
9.1 Secure your Aadhaar biometrics through the UIDAI website
To safeguard their Aadhaar biometrics, applicants can adhere to the guidelines below for locking the data:
-
-
- Visit the official UIDAI website.
- Click on ‘My Aadhaar,’ then go to ‘Aadhaar Services,’ and select ‘Lock/Unlock Biometrics.’
- Check the designated box and proceed by clicking ‘Lock/Unlock Biometrics.’
- Enter your 12-digit Aadhaar number along with the captcha code.
- Input the received OTP (One-Time Password) to activate the locking feature.
- Once completed, the biometric data associated with your Aadhaar will be securely locked.
-
9.2 Regain access to your Aadhaar biometrics by unlocking them through the UIDAI website
To unlock Aadhaar biometrics, applicants need to perform the following steps:
-
-
- Visit the official UIDAI website.
- From the ‘My Aadhaar’ menu, choose ‘Lock/Unlock Biometrics.’
- Tick the declaration box and click ‘Lock/Unlock Biometrics.’
- Provide your Aadhaar number and the captcha code.
- Click ‘Get OTP’ and enter the received OTP to enable biometrics.
- Once completed, the Aadhaar biometrics will be successfully unlocked.
-
9.3 Secure your Aadhaar biometrics using the mAadhaar application’s feature to lock them.
To lock your Aadhaar biometrics through the mAadhaar app, follow these steps:
-
-
- Log in to your mAadhaar app.
- Tap on thethree vertical dots in the application’s upper right corner.
- Navigate to Biometric Settings and enable the Biometric Locking option.
- An OTP will be automatically fetched and entered into the app from your registered mobile number (manual entry is unavailable).
- Once you approve it, your biometric will be locked. However, please note that the lock activation may take up to 6 hours.
-
9.4 Regain access to your Aadhaar biometrics by unlocking them through the mAadhaar application. Here’s how to do it:
To enable the verification of Aadhaar using your biometrics, you can unlock your biometric details conveniently through the mAadhaar app. Here are the simple steps:
-
-
- Access your mAadhaar app and log in to your profile.
- Tap on the three vertical dots in the app’s upper right corner, then choose Biometric Settings.
- Uncheck the Enable Biometric Locking box, and finalize the process by clicking the tick mark.
- An OTP will be sent to your registered mobile number and automatically entered into the app.
-
10. Baal-Aadhaar
The Aadhaar card issued for newborns or minor children is the ‘Baal Aadhaar’ card. Unlike the adult version, this card is blue and does not contain biometric information such as fingerprints or iris scans.
To obtain a Baal Aadhaar card for your child, follow these steps:
-
- Use the UIDAI website to find the nearest enrollment centre and bring a copy of the child’s birth certificate.
- One of the child’s parents must provide their Aadhaar number for authentication. This will link the Baal Aadhaar to the parent’s Aadhaar.
- Fill out the Baal Aadhaar application form with all necessary details, including a valid cellphone number for registration.
- A photograph of the child/minor will be taken. For children under the age of five, no biometric data is collected.
- Once the above steps are completed, collect the acknowledgement slip.
- After verification, you will receive an SMS to the registered phone number on the application form, and the Baal Aadhaar will be delivered to the specified address.
11. What is Aadhaar eSign?
Aadhaar eSign is a revolutionary system empowering Indian residents to sign documents using their Aadhaar identification data digitally. This cloud-based electronic signature service aims to expedite the process of signing official documents, making it more efficient, streamlined, and hassle-free.
To utilize Aadhaar eSign, it is essential to possess an Aadhaar card with a registered mobile number linked to it. The service combines two crucial elements: Aadhaar’s authentication and an electronic signature service provider (ESP). These ESPs are trusted third-party agencies approved by the Controller of Certifying Authorities (CCA) under India’s Information Technology Act.
Aadhaar eSign operates on a similar infrastructure as Aadhaar eKYC. However, the notable distinction lies in the fact that eKYC solely provides authentication, while Aadhaar eSign offers both authentication and the electronic signature of the Aadhaar holder. This comprehensive feature enhances the authenticity and reliability of digitally signed documents.
11.1 How Does Aadhaar-Based eSign Work?
The Aadhaar-based eSign mechanism follows these steps, utilizing Aadhaar data for digital signatures:
-
-
- Document Upload: Users begin by uploading the document they wish to sign onto the platform supporting Aadhaar eSign.
- Aadhaar Number Entry: Next, users enter their Aadhaar details, enabling the system to fetch demographic data from the UIDAI database to verify their identity.
- OTP Authentication: After entering the Aadhaar number, users receive a One-Time Password (OTP) on their registered mobile number linked with the Aadhaar. This OTP ensures the user’s identity before proceeding with the signing process.
- Electronic Signature Generation: Upon successful OTP verification, the Electronic Signature Service Provider (ESP) generates a digital signature on behalf of the user. It’s important to note that the Aadhaar holder does not manually create the signature; instead, it is done by the ESP.
- Document Signing:The generated digital signature is then used to sign the document electronically. The ESP attaches the digital signature to the document, rendering it a legally valid and signed document.
- Download/Share:The signed document is ready for download or can be directly shared from the platform, facilitating seamless and secure document signing.
-
12. What is a Masked Aadhaar Card?
A masked Aadhaar card closely resembles a regular Aadhaar card in appearance, with one significant difference: the Aadhaar number is partially hidden. In a masked Aadhaar card, the first eight characters of the Aadhaar number are replaced with ‘XXXX-XXXX,’ while the last four characters remain visible. However, apart from the Aadhaar number, all other information, such as name, gender, address, date of birth, and QR code, remains unchanged.
It is important to understand that a masked Aadhaar card is a valid proof of identity and is acceptable for various purposes like travel, ticket booking, and more. However, it cannot be used for government schemes and services. Individuals must provide their regular Aadhaar card for government schemes and related services.
12.1 How to Download Masked Aadhaar Card Online?
To obtain a masked Aadhaar card, ensure your mobile number is registered with the UIDAI. Follow these steps:
-
-
- Visit the official UIDAI website.
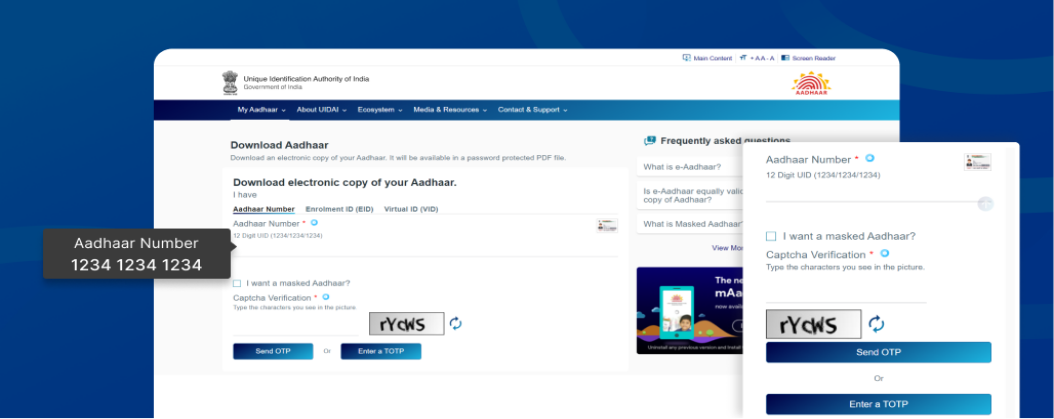
- Click on ‘My Aadhaar’ and then proceed to ‘Download Aadhaar.’
- Enter your Aadhaar number, Enrolment ID, or Virtual ID.
- Select ‘I want a masked Aadhaar.’
- Click on ‘Send OTP.’
 6. Submit the received OTP and provide the necessary details on the following screen. Then, request another OTP and confirm UIDAI consent.
-
7. Enter the new OTP and complete the survey to download your masked Aadhaar card.
12.2 How to Open a Masked Aadhaar Card?
To enhance security, a masked Aadhaar card is safeguarded with a password that must be entered before it can be shared, opened, or utilized. The password for a masked Aadhaar card consists of the first four letters of the user’s name and birth year.
For instance, if the user’s name is Mohit and his birth year is 1996, his password will be MOHI1996. This password ensures only authorized individuals can access and use the masked Aadhaar card, protecting the cardholder’s personal information.
12.3 Why Should I Use a Masked Aadhaar Card?
Using a masked Aadhaar card instead of a regular Aadhaar card offers several advantages, including:
-
-
- Partial Masking: A masked Aadhaar card allows users to partially mask their Aadhaar number, providing an added layer of privacy and security.
- Controlled Disclosure: When individuals wish to limit the disclosure of their Aadhaar card details, a masked Aadhaar card can be used to share only necessary information.
- Personal Use: A masked Aadhaar card is exclusively for the cardholder’s use, ensuring that sensitive data remains protected.
- Convenient Download: Unlike a regular Aadhaar card, which requires visiting an Aadhaar enrolment centre, a masked Aadhaar card can be downloaded anytime, making it more convenient for users.
- Versatile Proof of Identity: The masked Aadhaar card validifies identity, allowing users to accomplish various tasks confidently.
-
13. What Happens if PAN Becomes Inoperative?
13.1 Consequences of Inoperative PAN
Failure to link PAN with Aadhaar can lead to the PAN becoming inoperative, resulting in several consequences. These include higher tax deductions, withholding of any tax refunds, and non-payment of interest on such refunds. These consequences will occur from 1st July 2023 until the PAN is reactivated.
13.2 Exemptions from Aadhaar Quoting or Linking
There are some exemptions to the rule of quoting or linking Aadhaar in ITR or PAN applications. Individuals residing in Assam, Jammu and Kashmir, and Meghalaya, non-residents as per the Income-tax Act, those aged 80 years or more, and individuals who are not Indian citizens are exempted, provided they do not already possess an Aadhaar number or the Enrolment ID.
13.3 Is Linking Mandatory for Individuals Only?
Linking PAN and Aadhaar is mandatory for individuals only. However, income returns from HUF or non-corporate assessees can’t be e-verified unless the Karta or Principal Contact links their PAN with their Aadhaar.
13.4 The Interchangeability of PAN and Aadhaar
The law allows the use of Aadhaar in place of PAN. So, a person without a PAN but with an Aadhaar can use their Aadhaar number for transactions where PAN is mandatory and will be allotted a PAN accordingly. Moreover, if a person has linked their PAN with Aadhaar, they can use Aadhaar in lieu of PAN for any transactions mandating PAN under the Income-tax Act.
13.5 PAN Allotment Based on Aadhaar
If a person doesn’t have a PAN but has an Aadhaar and uses it for transactions where PAN is required, they’ll be deemed to have applied for a PAN and won’t need to apply or submit any documents. This feature has been enabled on the e-filing portal to allow instant PAN allotment based on the applicant’s Aadhaar.
14. How to submit a Grievance if Aadhaar cannot be linked with PAN?
The Income Tax Department has launched a facility to submit a grievance to the AO or various departments through the e-filing portal. The new e-filing portal can receive and address all such grievances under a single window.
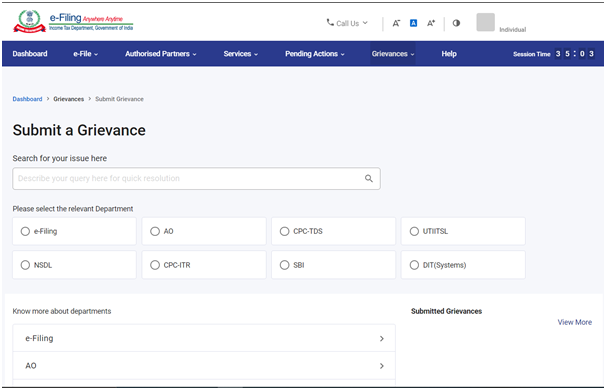
A taxpayer can submit the grievance to the following departments:
- e-filing
This department deals with the e-Filing of Income Tax Return or Statutory Forms and other value-added services like e-verification & e-proceedings. Grievances related to e-filing portal registration, profile or password, verification of ITR/Forms, e-proceedings, Instant PAN (e-PAN) through Aadhar or Cybercrime (related to income tax) shall be logged under this department.
- Assessing Officer
Assessing Officers are designated income tax officers who handle the assessment of taxpayers under their jurisdiction and can be contacted for ITR-related specific queries. Grievances related to Refund, Rectification, Demand correction, Appeal order, PAN-related application, or any other miscellaneous application pending with AO shall be filed to the Assessing Officer.
- CPC-TDS
This department is associated with the e-TDS scheme. Any grievance related to portal access/registration, processing of TDS statements, Defaults, Challan/BIN corrections, Form 26AS, Form 16/27D, TDS Refunds, and TDS on Sale of property shall be logged under this department.
- UTIITSL
This department deals with the issuance of PAN/ TAN and related queries. Any grievances related to Discrepancies/Errors in PAN application, Allotment of the same PAN to multiple entities, Logistics (Delivery of PAN card), or Aadhar Seeding shall be logged under this department.
- NSDL
This department deals with the issuance of PAN and related queries. Any grievances related to Rejected/Pending PAN applications, Discrepancy/Errors in PAN applications, Allotment of the same PAN to multiple entities, Logistics (Delivery of PAN card) or Aadhar Seeding shall be logged under this department.
- CPC-ITR
This department handles Income Tax Returns processing. All grievances related to ITR-V status, Intimations or Notices u/s 139(9) or 143(1), Refund not received, Income Tax Processing Related processes, Social Media grievances, or Feedback shall be logged under this department.
- SBI
This department deals with issuing tax refunds to the taxpayer post-ITR processing. Any grievances related to Refund Failed, Refund credited in the wrong account, and Refund paid but not credited in the account shall be logged under this department.
- DIT(Systems)
This department manages Information Technology related systems in the Income Tax department. Any technical issues in the e-Filing website, PAN-related, Tax payment system (OLTAS), Escalation on existing Refund Banker (SBI) issues, Assessment, and Information mismatch shall be logged under this department.
The following steps for submitting the grievance will be followed if Aadhaar cannot be linked with PAN.
Steps to Submit Grievance
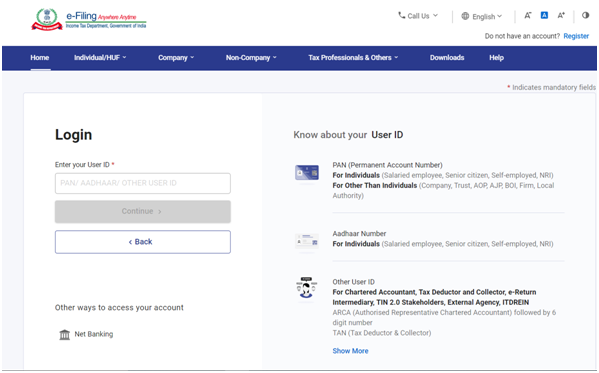
Step 1: Visit https://www.incometax.gov.in/iec/foportal
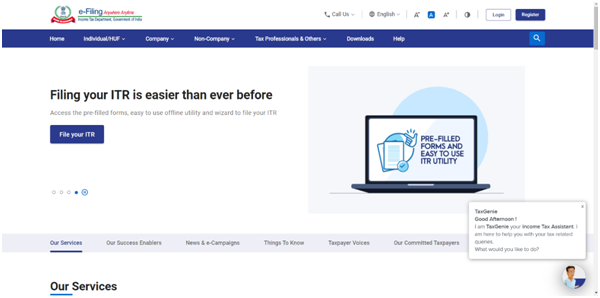
Step 2: Log in using your registered PAN and password.
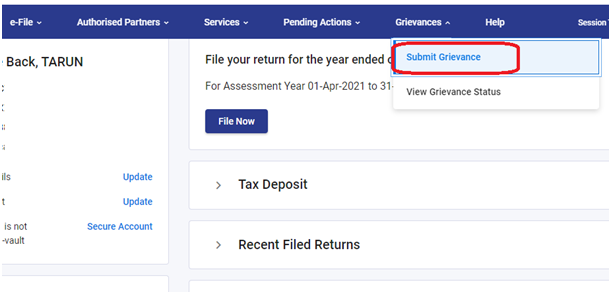
Step 3: Go to Grievances>Submit Grievance.
Step 4: You will be redirected to the ‘Submit a Grievance’ page. Select the relevant department with which the grievance is to be submitted
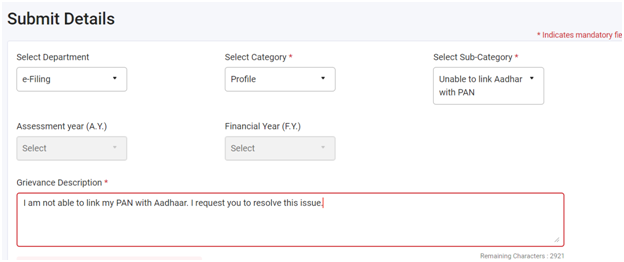
Step 5: After selecting the relevant department, select the category and subcategory of grievance from the drop-down list and click on ‘Continue’.
Refer to the snapshot below to check the details required to be filled while filing a grievance if Aadhaar cannot be linked with PAN. The assessee can also upload the files from the list or other documents. Upload the file by clicking on ‘Upload Attachment’ and click ‘Submit Grievance’ for submission.
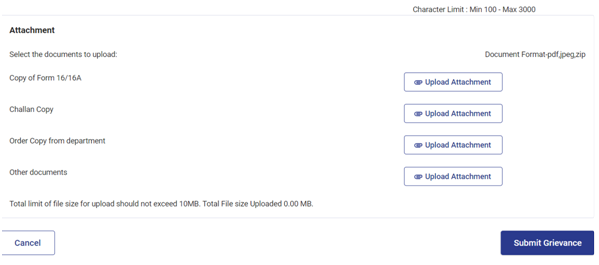
The grievance will get submitted, and an acknowledgement message of submission will be displayed on the screen.
15. Aadhaar Services
To enhance transparency and efficiency in the Aadhaar process, UIDAI offers various services related to Aadhaar processes and features. Here’s a brief overview of each:
-
- Verify Aadhaar Number: Applicants can check the status of their Aadhaar card, whether it is active or deactivated.
- Verify Mobile Number or Email: Registering an email address and mobile number during the Aadhaar application to receive updates and notifications on services is advisable. Users can verify their registered mobile number and email address.
- Retrieve Aadhaar Number: If you have misplaced or lost your Aadhaar card, UIDAI provides a simplified retrieval process to retrieve your Aadhaar number, VID, or EID electronically. A registered mobile number is necessary for this retrieval.
Dive Deeper:
Step-by-Step Guide to Obtain Lost Aadhar Card - Check Aadhaar Linking Status: Applicants must link their Aadhaar card to their bank account to access government subsidies and schemes. The status of this linking process can be checked on the official UIDAI website.
- Generate Virtual ID (VID): The UIDAI introduced VID to protect data and provide limited KYC access to vendors/merchants seeking Aadhaar information for various services.
- Lock/Unlock Biometrics: Individuals can lock their biometrics or temporarily unlock them using the Virtual ID for enhanced privacy. This feature is available on the official UIDAI website.
- Check Authentication History: Each time Aadhaar information is used, details of the Authorized User Agencies accessing it are logged. Users can check their authentication history to monitor who has accessed their Aadhaar data, ensuring information security.
16. Frequently Asked Questions (FAQs)
1. What to do if Aadhaar cannot be linked with PAN?
Facts
Mr A was linking his PAN-Aadhaar. He was getting errors while linking it and couldn’t do it.
Provision of the Act
Every person allotted PAN eligible to obtain an Aadhaar number shall link his PAN with Aadhaar. In case the assessee fails to do so, the PAN allotted to the person shall be made inoperative. If the Aadhaar number isn’t yet linked with PAN, then every time the assessee logins at the e-filing portal, he will be shown a pop-up message to link his Aadhaar Number with PAN. Use the link in the pop-up window to link the Aadhaar with PAN.
Possible Resolution
Mr A can take the recourse of the below-mentioned procedures:
Resolution: Submit the grievance
Mr A can choose to file a grievance on the e-filing portal. To submit the grievance, the assessee shall log in to the e-portal and submit a grievance to the concerned authority with relevant documents and a description.
After submitting the grievance, Mr A can check the status of his grievance, which can be either of the following:
-
- Pending: In this case, the taxpayer is required to wait.
- Has Been Resolved.
- Has Been Transferred to AO: In this case, the taxpayer must visit the jurisdictional assessing officer to resolve the grievance.
- Pending for Documents: The department can always ask the assessee to submit the necessary documents to verify the assessee’s claim. These documents might be required to be uploaded to the e-filing portal or asked to be sent by post.
2. How to apply for instant e-PAN through Aadhaar?
A Permanent Account Number (PAN) is a ten-digit alphanumeric number issued to identify a taxpayer. PAN has to be mentioned in all communications with the Income-tax Dept. and in specified financial transactions which exceed the threshold limit.
A resident person can apply for PAN in Form No. 49A and a foreign citizen can apply in Form No. 49AA.
The department has also launched an Aadhaar-based instant PAN allotment service. If a person applying for PAN has a valid Aadhaar number issued by the Unique Identification Authority of India (UIDAI), he can opt for this service. Foreign Citizens cannot apply for PAN using this service.
This PAN is paperless, online and free of cost. This facility is only for those applicants who have an Aadhaar number from UIDAI and have registered their mobile number with Aadhaar. Applicants applying under this service will only be issued an e-PAN, a valid form of PAN.
Steps to apply for Instant e-PAN
Step 1: Go to the e-Filing portal homepage, click Instant e-PAN.
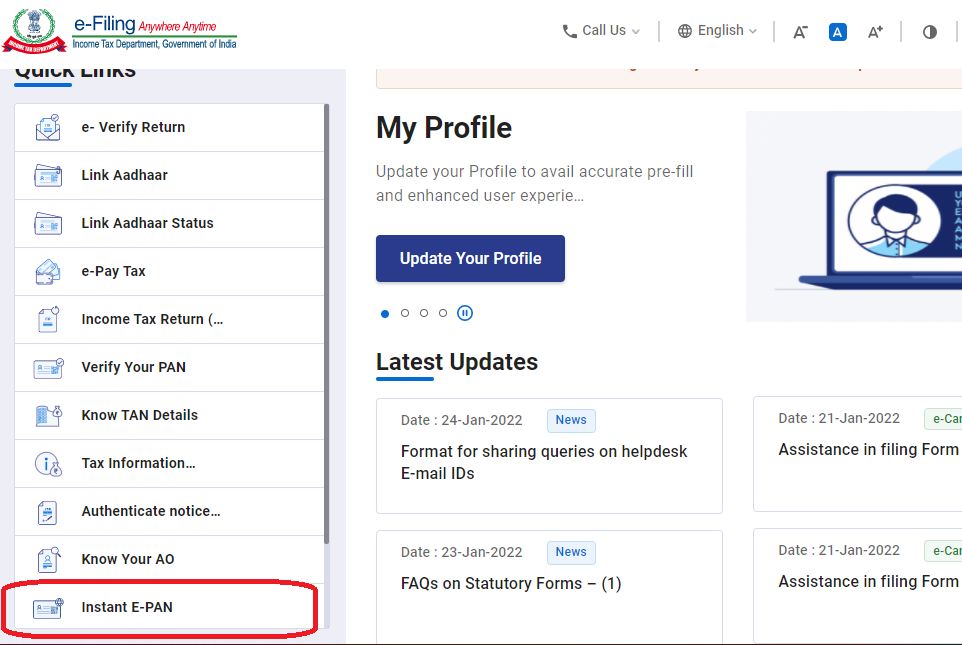
Step 2: On the e-PAN page, click Get New e-PAN.
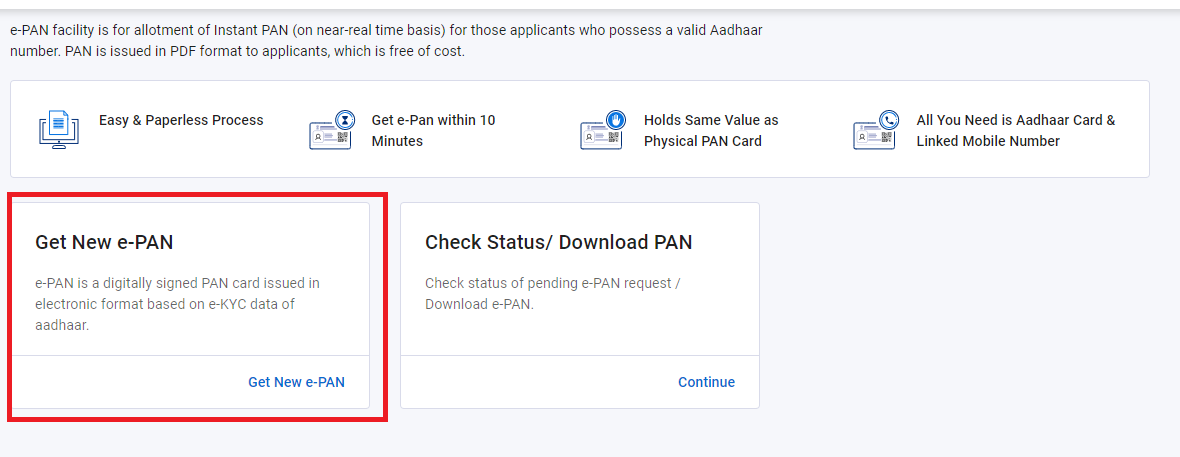
Step 3: On the Get New e-PAN page, enter your 12-digit Aadhaar number, select the I confirm that checkbox and click Continue.
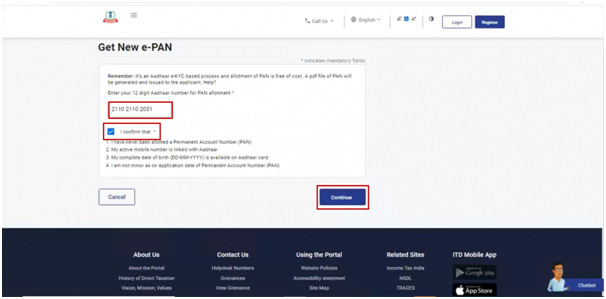
If the Aadhaar is already linked to a valid PAN, the following message is displayed – Entered Aadhaar Number is already linked with a PAN.
If the Aadhaar is not linked with any mobile number, the following message is displayed – Entered Aadhaar Number is not linked with any active mobile number.
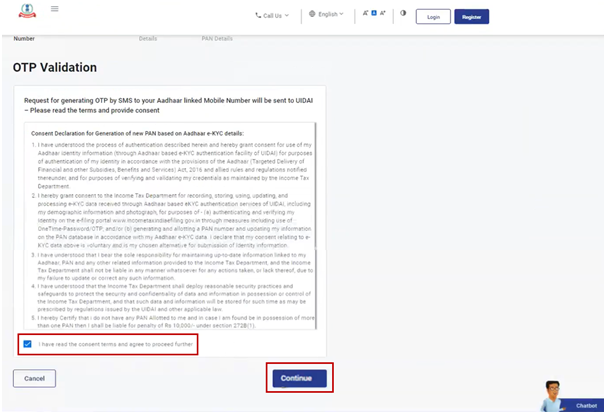
Step 4: On the OTP validation page, click I have read the consent terms and agree to proceed further. Click Continue.
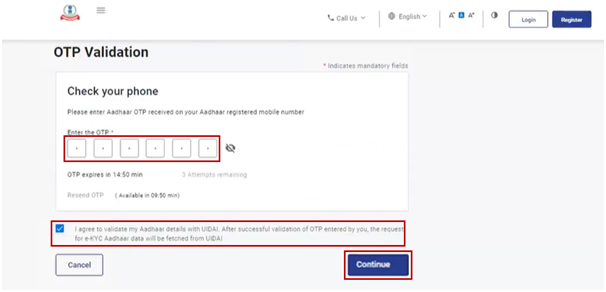
Step 5: On the OTP validation page, enter the 6-digit OTP received on the mobile number linked with Aadhaar, select the checkbox to validate the Aadhaar details with UIDAI and click Continue.
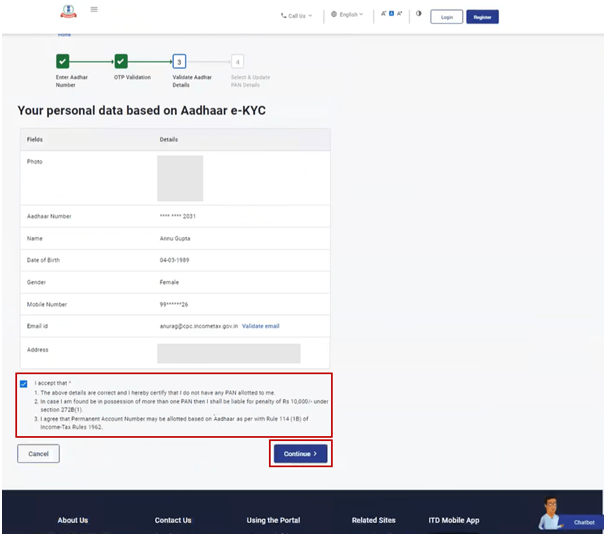
Step 6: On the Validate Aadhaar Details page, select the I Accept that checkbox and click Continue.
Step 7: A success message and an acknowledgement number are displayed on successful submission.
Please keep a note of the Acknowledgement ID for future reference. You will also receive a confirmation message on your mobile number linked with Aadhaar.
3. What to do if an error occurs in Aadhaar Seeding?
Facts
Mr A is trying to link his Aadhaar-PAN. He got some error while Aadhaar seeding and couldn’t complete the process.
Provision of the Act
Every person allotted PAN eligible to obtain an Aadhaar number shall link his PAN with Aadhaar. In case the assessee fails to do so, the PAN allotted to the person shall be made inoperative. If the Aadhaar number isn’t yet linked with PAN, then every time the assessee logins at the e-filing portal, he will be shown a pop-up message to link his Aadhaar Number with PAN. Use the link given in the pop-up window to link the Aadhaar with PAN.
Possible Resolution
Mr A can take the recourse of the below-mentioned procedures:
Resolution – Submit grievance
Mr A can choose to file a grievance on the e-filing portal. To submit the grievance, the assessee shall log in to the e-portal and submit a grievance to the concerned authority with relevant documents and a description.
After submitting the grievance, Mr A can check the status of his grievance, which can be either of the following:
-
- Pending – In this case, the taxpayer is required to wait.
- Has Been Resolved.
- Has Been Transferred to AO – In this case, the taxpayer must visit the jurisdictional assessing officer to resolve the grievance.
- Pending for Documents – The department can always ask the assessee to submit the necessary documents to verify the assessee’s claim. These documents might be required to be uploaded to the e-filing portal or asked to be sent by post.
Disclaimer: The content/information published on the website is only for general information of the user and shall not be construed as legal advice. While the Taxmann has exercised reasonable efforts to ensure the veracity of information/content published, Taxmann shall be under no liability in any manner whatsoever for incorrect information, if any.

Taxmann Publications has a dedicated in-house Research & Editorial Team. This team consists of a team of Chartered Accountants, Company Secretaries, and Lawyers. This team works under the guidance and supervision of editor-in-chief Mr Rakesh Bhargava.
The Research and Editorial Team is responsible for developing reliable and accurate content for the readers. The team follows the six-sigma approach to achieve the benchmark of zero error in its publications and research platforms. The team ensures that the following publication guidelines are thoroughly followed while developing the content:
- The statutory material is obtained only from the authorized and reliable sources
- All the latest developments in the judicial and legislative fields are covered
- Prepare the analytical write-ups on current, controversial, and important issues to help the readers to understand the concept and its implications
- Every content published by Taxmann is complete, accurate and lucid
- All evidence-based statements are supported with proper reference to Section, Circular No., Notification No. or citations
- The golden rules of grammar, style and consistency are thoroughly followed
- Font and size that’s easy to read and remain consistent across all imprint and digital publications are applied


 CA | CS | CMA
